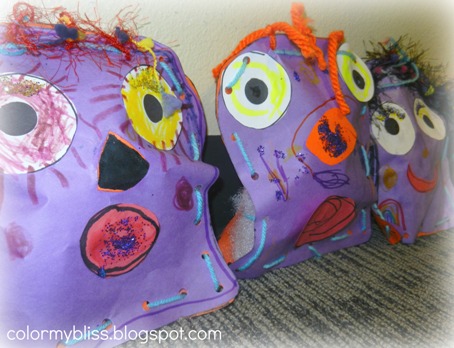
My group of three, four, and five year-old's loved this art project. I even had two 2 1/2 year old's that did pretty darn good with lots of assistance. Imaginations were soaring and they even learned a bit of sewing. (without needles)This was simple, fun, and they especially loved the end results.
You will need:
- Poster board (to make templates of the monster bodies, and eyes for the kids to trace)
- Colored paper (I used the kind on the big rolls)
- White construction paper for eyes, black for pupils
- Construction paper for mouths, noses, etc...
- Colored markers
- Thin yarn for sewing the two pieces of the monster together
- Crazy yarn for hair
- Hole punch
- Glue sticks (to adhere eyes, nose, and mouth)
- White glue and glitter
- Polyfill stuffing
Instructions:
Using the poster board, make a template for the monster with a general blob shape, as you can see in my photos. Also, make a circle for the eyes and smaller one for the pupils. The monsters are a bit bigger than the childrens' faces.
If your kids are able to trace and cut, instruct them to trace two bodies on the colored paper, and the eyes on white, etc... My group was pretty young and we only have an hour together so I precut their pieces ahead of time. They will need two bodies, two white eyes and 2 black pupils. Also have them free-hand mouths and noses and cut them out. Or, they can draw mouths and noses.
Be sure they decorate both the front and back of their monster with markers
Let the kids glue on their eyes, noses, mouths and then color them with markers. The more fun scribbles on their monsters, the better!
When finished with the monster decorating, put the front and back of the monster together, decorated sides facing out. Using the hole punch, punch holes all around both pieces about an inch or so apart.
Starting at the bottom left corner, show the children how to weave the yarn, in and out of the holes, as if sewing them. Sew all around, leaving the bottom of the monster open. Lightly stuff him with the polyfill and then sew up the bottom. Tie a knot at the end. Cut the yarn.
Give kids a choice of giving their monster crazy hair. Cut the crazy yarn in little 6" pieces and tie it through three or four of the holes at the top of the monster's head, This makes him extra cute!
Last step is to let the kids dab a bit of white glue on their monster's face, and then add glitter. Most kids love, love the glitter.
Also published in Mermaids of the Lake online women's magazineFollow Debbie's board Art for Children on Pinterest.


No comments:
Post a Comment
I would love to hear from you. Thank you for leaving a comment.